Eric Aune, Aune Plumbing LLC, Zimmerman, Minn. Dan Foley, Foley Mechanical Inc., Lorton, Va. Andy Mickelson, Mickelson Plumbing and Heating LLC, Missoula, Mont. From across the PHCC Connect trade show floor, a new product offering recently caught the eye of our ProStaff team members. “I like to walk Read more
ProStaff Reviews
 Eric Aune, Aune Plumbing LLC, Zimmerman, Minn.
 Dan Foley, Foley Mechanical Inc., Lorton, Va.
 Andy Mickelson, Mickelson Plumbing and Heating LLC, Missoula, Mont.

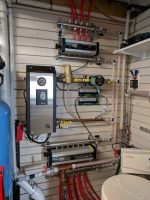
The Cross Manifolds with two primary zones: a garage and a partially finished basement.
From across the PHCC Connect trade show floor, a new product offering recently caught the eye of our ProStaff team members. “I like to walk trade shows as I need to physically see a new product before I can evaluate it. I need to touch it, pick it up, and examine it before I make a purchasing decision,” says Dan Foley.
The sparkle in Foley’s eye was the new Cross Manifold system, which combines a zone relay, manifold and zone valves in one compact, pre-wired package. “Any product that saves space, man-hours on the job site, and minimizes wiring gets my attention,” says Foley, whose company specialty is hydronic and radiant systems installations.
Big Sky Zoning
From almost entirely across the country, ProStaffer Andy Mickelson recently installed the Cross Manifold system on a job near Missoula, Mont. The Cross Manifolds were installed in a radiant floor system with two primary zones: a garage and a partially finished basement.
The project called for a simple electric boiler with one circulator feeding the two radiant manifolds. After receiving the manifolds, Mickelson was immediately intrigued with the packaging. Cross Manifold comes in what appears to be a plain cardboard box. On the inside is a well laid out divider that separates the smaller components from the manifold. The parts compartment features basic instructions, a plug-in 24 VAC transformer, the zone control, a pair of 1” NPT isolation valves with thermometers, drain and purge valves and a couple of spare O-rings.
https://youtu.be/Tj5II67NKu0
Beyond the small parts divider is the manifold and actuator module. The manifolds come in 4-port thru 12-port configurations, with or without flow meter balancing valve assemblies. Mickelson ordered a 4-port and 6-port for our project, both with flow meter assemblies. When ordering the manifolds there is the option for 1/2” or 3/4” crimp PEX or 1/2” or 3/4” press–sweat adapters.
Installation of the manifold was a simple process, says Mickelson, who used 1/2” PEX adapters on the installation. “I have installed a number of manifolds that had poor threads on the adapter ports or on the isolation valve ports; this is not that type of manifold. Everything went together finger tight, at which time we then bumped them up with an end wrench. I was most impressed with the fit and finish of the sealing surface—not a single leak at the manifold,” says Mickelson.
https://youtu.be/fCtXoGbRWdI
Mickelson’s only complaint or suggestion was that he could not find anywhere in the manual where it indicated flow direction. It took playing with the flow indicator to figure out which was supply and which was return. The actuator module is attached with two thumb screws, one on each end. Something worth noting: All of the ports on the manifolds come with caps; the adapters are shipped loose. The advantage here is that any unused ports are already capped, no need to purchase additional components.
With all of the piping complete and the actuator mounted, we moved on to the wiring, continues Mickelson. The 24 VAC power supply is attached to the zone control module with two conductors. The thermostats are connected to the zone inputs along the bottom, which include “R”, “W” and “C” terminals. The “C” terminal being important these days, as nearly all Wi-Fi stats require a “C” terminal to operate the Wi-Fi radio properly.
https://youtu.be/u1ljWFCrcA8
The power draw on this manifold is quite low as the design allows only one circuit to be opening or closing at a time. In Mickelson’s installation, they had one thermostat controlling each manifold, so the circuits that we used had to have the “W” terminals jumped. The “SW Out” terminals provide a dry contact closure to initiate a call for heat to a boiler or other control. The control board also includes a 24 VAC output to operate pump relays or other pilot duty loads. This board has a 1.5 amp fuse holder built in.
“I would like to see an additional fuse included, as accidents do happen,” says Mickelson. The zone control does need to be mounted relatively close to the actuator module, as the two are connected with a Molex plug wiring harness. The harness is roughly 18” long.
https://youtu.be/6cs1l0W5Tx8
Capitol Manifolds
Back in D.C., Foley had an 8-zone radiant heating project he needed to pipe and wire. Typically Foley would have piped a copper manifold, installed eight zone valves, and wired in two 4-zone relay panels. With the Cross Manifold System, the eight zones come pre-piped and pre-wired. The stainless steel manifold assembly is simply bolted to the wall and piped to the boiler. The radiant zones are tied in and the thermostats connected to the terminal strip. The zone valves are already wired.

Installation of the Cross Manifold from Foley Mechanical.
“The system was installed and started this past January. “Running nearly four months now, the system has performed flawlessly,” says Foley.
Foley had only one issue with the Cross Manifold, but it was self-inflicted: the installer over-tightened one of the connections causing it to crack. The instructions were clear: hand tight is sufficient. “Cross was kind enough to overnight a replacement fitting and we had it repaired the next day. Technical support was responsive and knowledgeable,” says Foley.
To the north, Minnesota’s Eric Aune installed a Cross system recently and offers some assembly and installation tips.
Unpacking and assembly:
- One box contains everything needed for the install.
- The instructions are simple illustrations, and if one has never used one of the manifolds, it can be a bit confusing for first-time users.
- In the event that any of the loop connections are not needed on the model you order, it is shipped with plugs on every outlet.
- The manifold is shipped with every outlet connection plugged; tubing adaptor fittings are included in the box.
- If you order flow meters, those will have to be assembled onto the manifold as well, removing the stainless plugs in their place for assembly.
- The whole kit includes the manifold, tubing adaptor fittings, motorized control box, zone control module and power supply cord.
Installation on the wall:
- This manifold sticks out from the wall more than other manifolds on the market, so if it has to be concealed in a stud cavity, you’re not going to do that without a 2 x 8 at least, this needs to be known ahead of time.”
- The manifold brackets are like all other standard brackets and position the manifolds offset from each other and from the wall.
- Since the loop actuators are actually ball valves installed on every outlet there is no additional valve actuator to assemble onto the manifold; the motor carriage simply bolts onto the front of the manifold and connects to the zone control module.
- The motor carriage connects to the control module with a prewired molex-type plug. “I would prefer this was about a foot longer because it requires the module to be placed rather close to the manifold but it makes for very easy and fast wiring, eliminating the need to spend an hour or two wiring each zone individually,” says Aune. This also eliminates the need to have control wiring in stock for this task.
- The quality of the stainless steel threaded connections seems better than some others Aune has worked with in the past. Rubber gasket connections on these types of manifold often leak upon initial fill requiring adjustments and time; the Cross manifold had zero leaks on fill and startup.
- Each individual ball valve on the loops is made from an engineered plastic that moves very freely and gives the first impression of excellent molding and fitment. “These are serviceable/replaceable parts, I will be ordering a few replacements to keep on the truck,” says Aune.
Overall Impressions
“Overall, I would say the time saved by not having to wire individual zone actuators is noteworthy,” says Aune. Although the product is well designed, continues Aune, some improvements to the information and ordering experience on the website could be made to speed that process up and increase confidence that you’re in fact ordering exactly what you need the first time.
“Of course, as you install more of these, that will be less of a factor,” says Aune. “I have one manifold in operation at this time and have already considered using more for either replacement or new installation as I am overall impressed with its performance.”

Foley see several advantages to the Cross Manifold system. No. 1: It’s a time saver—it saved time vs. field fabricating and field wiring. No. 2: Neatness and uniformity: The compact manifold saves wall space and looks professional. It also eliminates the variation of field technicians piping and wiring jobs differently. No. 3: Pre-wired—Low voltage wiring can be a challenge at times. This system is pre-wired from the factory minimizing wiring issues.
“I give the Cross Manifold two thumbs up and intend to use it on future projects,” says Foley.
Overall, Mickelson was very impressed at how quickly the manifold was mounted, piped and wired. “If we had been using multiple thermostats on each manifold it would have been exponentially quicker than wiring up tele-stats and zone control boxes. Once we got the boiler mounted and filled, start-up was a breeze, only requiring us to balance each circuit with the flow meter balancing valve,” says Mickelson.
The actuator is incredibly quiet during its operation, which only takes a few moments to open all of the valves. Once the operation is complete, the actuator module is at rest until the valves need to be closed. Interestingly, the actuator module actively monitors the valves to ensure that they are not moved out of position. If a valve for some reason is incorrect or manually moved, the module will correct that condition accordingly.
“Overall I am impressed with the installation, operation and quality of the manifolds,” says Mickelson. “I look forward to adding these manifolds to our arsenal of products to offer to our customers.”
For more information on the Cross Manifold System, www.crossmanifold.com.
Cross Manifolds are available through plumbing & heating wholesale distributors nationwide.
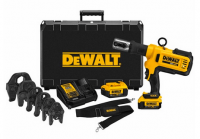
It’s been two months since I took delivery of the Dewalt DCE200 press tool and I’ve had the opportunity to put it to work on a handful of jobs now. This is a feature-packed tool unlike many on the market today. With capabilities of handling any and all press systems common in North America and Read more
 It’s been two months since I took delivery of the Dewalt DCE200 press tool and I’ve had the opportunity to put it to work on a handful of jobs now. This is a feature-packed tool unlike many on the market today. With capabilities of handling any and all press systems common in North America and Europe team Black & Yellow pulled out all the stops in engineering their first at what I’m guessing will be a team of press tools to come.
First off I’d like to cover the important specs.
- Capable of pressing ½”-2” copper & stainless steel V-groove fittings
- Compatible with competitor jaw sets for Iron Pipe [Mega-Press]
- Compatible with competitor jaw sets for PEX press [Viega/Nibco]
- 4-ton pressing force
- Current online pricing searches average $1999.00
I first learned of this tool back in July/August of 2016 at the annual new tool event hosted by Dewalt. When I first put my hands on it I admit I was a little surprised of the physical size overall but after using it for both boiler and tankless water heater installations now I can honestly say the size of the tool has not proved to be an issue at all. Weighing in at 7.16lbs without a jaw it is lighter than other comparable tools common on the job today. Ergonomics may be a slightly different story and I do carry a bias toward in-line design press tools. This tool is front-end heavy, loaded with anything over 1″ jaws and it will not stand on it’s own. That may be partially due to the small footprint of the 20V battery or the handle angle and placement. Either way its a strain on the wrist and requires two hands to steady the tool most of the time.
Features
This pistol-grip press tool is packed with some new innovation to the market that should prove useful to many contractors working on commercial & residential projects alike. Notably, Dewalt’s proprietary software system Crimp Connect. This free software download allows the owner/user to connect the press tool via the onboard mini USB port providing ability to print detailed reports of the date, time, force, and successfully completed cycles of the presses completed by the tool as well as the tools calibration and service history.
 Located on the top rear of the tool you’ll find a somewhat familiar interactive panel where the tool’s power is controlled along with LED light indicators showing the successful completion of a single press, battery indicator, low & high temperature warnings. There’s even a “service required” indicator light telling the user that the tool has reached the cycle limitations.
While the power panel is not unique to press tools of this caliber, the Crimp connect feature is. An added feature I found interesting is the double trigger.
 The bottom trigger controls the start and completion of the press cycle. Dewalt went with a “manual” cycle operation here. You’ll need to depress the trigger completely for the duration to complete the press cycle. Cycle time is anywhere between 4-6 seconds depending on the diameter and type of material being pressed. The unique second trigger, the top trigger can be used to release the press cycle at any point. This is useful when a cycle has started but the operator decides [far various reasons] to stop the press. When pressed fully, the top trigger will release the pressure in the hydraulic cylinder and allow the ram to retract quickly. This would allow for repositioning of the tool or fitting when needed, potentially saving a fitting from incorrect attachment to the piping.
A shoulder strap and ring attachment point are included with the tool. Dewalt states in the manual that it should be used for transporting the tool on the jobsite. Some feedback I have received from other plumbers is the strap may be useful when working on a ladder, a situation that often lends to the possibility of dropping a tool like this….I’ve done that and it wasn’t pretty.
The tool is made in France but the jaw set is delivered to Dewalt from Germany. Dewalt is offering a 3 year limited warranty, 1 year service and 90 day money back guarantee. You’ll most likely have to order this tool from specialty tool suppliers offering the whole Dewalt lineup. You can also look to plumbing and mechanical supply houses for stock as well.
https://www.youtube.com/watch?v=WVIlalA-Abs
Innovation takes on many forms, but in the world of plumbing and HVAC piping systems, change and or progress has been somewhat slow to take place. Copper press fitting systems have been on the scene for nearly 20 years in the U.S., even longer in Europe, but industry-wide adoption is a work in progress. If Read more
Innovation takes on many forms, but in the world of plumbing and HVAC piping systems, change and or progress has been somewhat slow to take place. Copper press fitting systems have been on the scene for nearly 20 years in the U.S., even longer in Europe, but industry-wide adoption is a work in progress. If you’ve been following us here on The Hub you already know my opinion that pressing copper or iron pipe for nearly every application is not only efficient but also profitable for any size contracting firm. But I’m not here to debate the merits of press versus soldering or threading; instead, I’d like to talk about a couple new tools we’ve had in the shop for review.
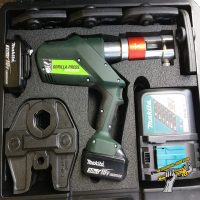
The new Gorilla™ pressing tool line features two unique tools: the inline battery pressing tool (INLNPRESS-KIT19kN) and the pistol grip battery powered pressing tool (PSTLPRESS-KIT32KN). I’ve personally put both tools to work on a handful of plumbing and heating projects over the last month, and I’m impressed.
Not unlike other press tools in the market the Gorilla press tools will complete a watertight connection, whether pressing copper, steel or PEX, with a 3-5 second cycle time. Here are the features of each tool kit broken down separately:
 Pistol Press (PSTL-KIT32kN)
The larger of the two Gorilla press tools is capable of pressing up to 2″ copper or steel fittings with the included tongs/jaws. When equipped with compatible jaws such as the RIDGID XL-C or Milwaukee M18 ring sets the pistol tool is capable of joining 2-1/2″ thru 4″ copper and steel. Greenlee offers additional factory supplied jaw sets for PEX Press systems (NIBCO) as well.
The key here is jaw compatibility. For contractors who already own other press tools or for those looking at a new press tool as a first purchase knowing what tool is right for you based on its capabilities should be the focus. The PSTL tool is compatible with all of the Viega PROPRESS copper, stainless and iron pipe (MEGAPRESS) fitting systems when either using the Greenlee jaw sets for 2″ and smaller copper or the RIDGID or Milwaukee M18 jaws for XC copper fittings or MEGAPRESS. A list of compatible jaw sets is included at the bottom of this review.
The PSTL-KIT32kN kit includes six V-profile copper/steel press jaws in sizes from 1/2″ to 2″, two 3.0Ah 18V Makita battery packs, rapid battery charger and heavy duty case with foam tool organizer insert. The 7,200 lb (32kN) force is delivered to the jaw set at the end of the swivel shaft. The unique pistol-grip offers an ergonomic design, placing the majority of the weight directly over the users hand and wrist for more balanced control when using the large diameter jaws. A single trigger deploys the hydraulic piston for a 3-5 second press cycle but is not automatic, requiring the user to fully depress the trigger for the entire cycle. However, once the press is complete, the tool retracts automatically, which does not require the operator to hold the trigger. In addition, the tools have the ability to retract the jaws at any point in time. An indicator light illuminates if the tool senses insufficient force during a press cycle and AUTOSTOPP technology stops the piston once optimal force is reached to complete the press of a fitting. The tool carries a 5-year warranty from the manufacturer and boasts the ability to go 40K press cycles before factory authorized service is required.
Inline Press (INLNPRESS-KIT19kN)
This is the more compact tool of the Gorilla lineup. Measuring in at just over 17″ when geared up with the 3/4″ copper jaws this swivel shaft tool is sleek and capable of sitting in tight spaces where only one hand may be appropriate for tool operation. The 4,275 lb (19kN) force tool features a single trigger, swivel head and 18V Makita 2.0Ah 18V battery.
The inline tool is capable of pressing both PEX press [up to 1-1/2″, see video] and v-profile copper/steel fittings (Viega type) up to 1-1/4″ diameter making it prime for all residential applications. As with the pistol tool the inline tool carries a 5-year manufacturer warranty and is capable of pressing 40K times in between service intervals. Press cycle time is 3-5 seconds depending on fitting type and diameter. The user is required to depress the trigger for the entire press cycle until the AOTOSTOP technology feature senses sufficient force, the piston retracts automatically the same as the pistol tool. The kit includes two Makita 18V batteries, rapid charger and heavy duty case with rigid foam organizer insert.
Recap
Overall the build quality of the Greenlee Gorilla press tools is high. Having been manufactured in Germany by the Greenlee owned Klauke tool company they’re developed from years of pressing experience and thousands of tools having been in use for many years. The 5-year warranty is impressive and compatibility with other manufacturer jaw sets makes both models very attractive in my opinion. Current jaw offerings open these tools up to the popular Sporlan Zoomlock refrigeration press fitting system as well even further expanding the capabilities and usefulness of these tools to HVAC contractors as well as plumbers. The Inline tool kit should be expected to price out between $2,100-$2,300, the more capable pistol tool will cost a contractor $3,300-$3,500 for the kit making both tools competitive in the press tool market.
https://www.youtube.com/watch?v=z9SXJYzzIGw
https://www.youtube.com/watch?v=Cys2STrvtRc
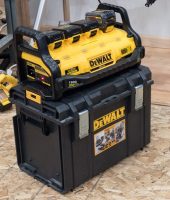
The new FLEXVOLT system from Dewalt has opened up a whole new line of tools and possibilities for the pro contractor looking to get more done in less time. We’ve had a few of the FLEXVOLT tools at work in our shop and in the hands of the ProStaff team for a couple months now Read more
The new FLEXVOLT system from Dewalt has opened up a whole new line of tools and possibilities for the pro contractor looking to get more done in less time. We’ve had a few of the FLEXVOLT tools at work in our shop and in the hands of the ProStaff team for a couple months now and continue to be impressed. The latest is the DCB1800 Portable Power Station.
The power station is a combination 4-bank parallel battery charger and DC power inverter capable of providing 1800 watts continuous power at 15A with a peak power rating of 3600 watts 120v. That’s some serious power, this thing is sick.
There are a still a lot of tools on the job that haven’t lent well to cordless technology yet. Core drills, large demo hammers, compressors and various saws. Add to that the many contractors still using corded tools where upgrades either haven’t been in the budget or replacement of a perfectly good tool is unwarranted and you’ve got the need for portable power.
The DCB1800 power station is a portable generator running off (4) 20v MAX batteries, not a gas engine so indoor use is not a problem. The inverter is silent in comparison to any other portable power solution as well making it a non-factor where noise is a obstacle to getting the job done. This is a gamechanger for those looking to knock out some punch list items at the end of the job or quickly get in and out to complete a task with a corded tool when cordless isn’t available.
I wanted to get an idea of how much power this thing has so I loaded it up with (1) FLEXVOLT 20/60v MAX pack and (3) 20v MAX batteries, all new and fully charged and plugged my DW734 thickness planer in to it. I ran (14) 2×8 Fir boards thru the planer before losing power supply. The low power indicator lights started flashing after 10 boards, giving me four more complete before shutting down. That’s 112 feet of planing 2×8’s! I’d imagine ripping some plywood for backing or chipping with a rotary hammer for 20-30 minutes is within reach with a power supply like that. I’ll be putting this to the test on the job soon so stay tuned, for now check out video proof of my test:
https://youtu.be/bHT9eJi9cvM
Job Scope: Remote lake home with hydronics ceilings & panel radiators Dual-fuel system (Electric boiler w/ High efficiency back-up) Septic waste system for onsite waste removal The majority of new or replacement heating system installations include high efficiency condensing appliances. The condensate is produced as a product of the appliance operation; in this case the Read more
Job Scope:
- Remote lake home with hydronics ceilings & panel radiators
- Dual-fuel system (Electric boiler w/ High efficiency back-up)
- Septic waste system for onsite waste removal
The majority of new or replacement heating system installations include high efficiency condensing appliances. The condensate is produced as a product of the appliance operation; in this case the boiler extracts additional btu’s contained in the water vapor of the flue gasses. When the flue gas temperatures drop below the approximate dew point of 135°F the water vapor condenses and the resulting liquid is acidic. This acidic condensate liquid requires treatment to avoid damage to piping systems, septic systems, treatment facilities and other items it may come in contact with. Many municipalities now require condensate treatment with all new installs and permitted replacements.
Read more about condensate neutralizing here:
The importance of neutralizing condensate produced by high efficiency gas fired appliances
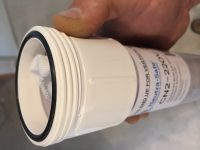
A recent family lake home project gave me the opportunity to install the Neutra-Safe clear tube style neutralizer model CN-220V. You may be familiar already with neutralizers but I assure you this one is different than others I have installed in the past. The expected wholesale cost of the kit should be approximately $50-60.
Product Specs:
- Capacity – 220,000 BTU/hr
- Connection/fitting size – ½” MPT / ¾” PVC Female Solvent Weld
- Tube body size – 2”
- Integral unions w/ O-ring seal (for servicing)
- Stainless Steel screen on inlet to prevent plugging of unit
- Media (included) – Calcite & magnesium oxide pellets (bagged/contained)
The CN2-220V is an “up-flow” or vertical neutralizer. This means the condensate enters the neutralizer at the bottom of the 2” clear plastic body, as the condensate passes thru the filter media it exits out the top center where piping is routed to a nearby drain or pump. This design assures all condensate passes thru the media where other designs do not require the entire media area to be flooded; thus allowing for small flow rates to pass thru a neutralizer without fully filtering and neutralizing above the typical PH of 2-4. The photo below shows a typical installation with the [included] mounting hardware and drain tubing routing.

Body & Media pictured here. Media shipped and installed bagged to prevent media materials clogging drain tubing.
I’ve installed multiple brands of neutralizers in the past, the CN2-220V is the first to include all the necessary mounting hardware, fittings for initial tubing connections and bagged media for ease of installation, this being all in one package negating the need to source additional parts to finish the install. Of course drain tubing is field supplied, along with the needed fittings for full installation.
 The Neutra-Safe tube style neutralizers feature integral unions with O-ring seals that greatly simplify removal for service and recharging. Un-threading a lock ring on either end of the unit allows the main body to be removed without disturbing the drain line. Replacement O-rings are included with tube style recharge kits and all tube style neutralizers are available with a snap-in mounting clamp option.
The media replacement schedule is one year, they’ve even included a model number sticker on the tube where you can write the date of installation/replacement for reference. You should expect the wholesale cost of media replacement, which includes the o-rings and bagged media, to be approximately $25-30.

Being that this installation was the first time I had held the product in my hands I can say it did take me a few minutes to figure out how the included fittings and tube were to be assembled but the included instructions made for a simple install.
I’ve seen many times the effects of acidic condensate can have on piping systems, floor drains and concrete surfaces and that is why I include a neutralizer with all my high efficiency installs. Furthermore, many of the municipalities in my area are requiring them for both new installs and replacements.