Many pro tradesmen and women work with grinders daily, with the advancement in battery tool technology cordless grinders have become a favorite tool for many trades because of the speed and versatility they offer. Small grinders fit into hard to reach areas and offer the ability to cut materials at speeds other tools cannot match Read more
ShopTalk
 Many pro tradesmen and women work with grinders daily, with the advancement in battery tool technology cordless grinders have become a favorite tool for many trades because of the speed and versatility they offer. Small grinders fit into hard to reach areas and offer the ability to cut materials at speeds other tools cannot match.
Simply put, grinders are such a useful tool and are found on the trucks of HVAC techs, plumbers and electricians alike.
For years I have used my grinder with a thin cutoff wheel for cutting into cast iron plumbing stacks and lateral drains and until just a couple months ago the wheel of choice has been a bonded abrasive disc. I have completely replaced all abrasive discs with the new Diablo Diamond Cutoff Wheels for many reasons, chief among them being safety.
We have all heard of bonded wheels shattering under load and causing the user physical harm. There’s no shortage of pictures available on the Internet of bits and pieces of abrasive wheels embedded in various body parts [go ahead and Google it but I don’t recommend it for anyone with an aversion to blood or graphic bodily injury, do so at your own risk] Diablo’s answer to safety concerns regarding metal cutoff wheels is the new solid metal cutoff discs that will not shatter or break when dropped or banged around a little on the site or in the truck.
These wheels will outperform abrasive cutoff wheels in life expectancy hands-down. Its important to know straight away that the continuous-edge diamond grit metal cutting discs are not all-day production cutoff wheels but for the tradesperson who uses a grinder for cutting occasionally throughout the day or week, this is a solid and safe alternative to a bonded wheel.
The speed in which bonded wheels remove materials is always going to be hard to beat. This cutoff disc will not match or beat an abrasive wheel but it will last considerably longer and remain the same diameter throughout its useful life. That’s not ever going to be true for a bonded wheel; yet another advantage Diablo’s disc offers the user.
For the last couple months we have actually began to use our grinders more because of these discs. Knowing I don’t have to search for a new cutoff wheel for nearly every tie-in out of concern that the disc already loaded on the grinder may have been compromised in handling or storage. Instead I have confidence that the solid metal disc will not shatter when I plunge thru the sidewall of the 4” no-hub in front of me.
Cutting pipe is not the only use we have for these wheels though, they’re often used to cut sheet metal, threaded rod, steel pipe and even during demo work the occasional slew of copper tubing nightmare.
One criticism I have for the design of the diamond grit cutoff wheels would be that they could benefit from an increase in thickness. They’re very thin and can become warped when put under high loads in heavy cuts. That’s an obvious problem requiring immediate replacement for not only performance but safety as well. Increasing the thickness of the disc and adding a segmented rim might best realize this. I have had multiple conversations with the design engineers and product managers about these wheels and have little doubt that this is just the first of an expanding diamond cutoff wheel product line.
So far I have only found these available at The Home Depot. Sizes ranging from 4.5”, 5”, 6” & 7” and costs starting at $14.97 in my local market (MN).
Overall I would definitely recommend exploring the new diamond grit cutoff wheels from Diablo. If you’re using a grinder for occasional metal cutting then you owe it to yourself to increase the safety aspect of this task.

Dewalt’s newest anchor system, the Mini-Undercut anchor is the first of its kind to gain all approvals and seismic ratings for use in post-tension slabs and can be used in a variety of concrete base materials like thin slab, hollow-core pre-cast etc. The anchor itself requires only 3/4” drill depth and has seismic code ratings Read more
Dewalt’s newest anchor system, the Mini-Undercut anchor is the first of its kind to gain all approvals and seismic ratings for use in post-tension slabs and can be used in a variety of concrete base materials like thin slab, hollow-core pre-cast etc. The anchor itself requires only 3/4” drill depth and has seismic code ratings for holding values of up to 4” pipe. The drill bit has a fixed stop only allowing for 3/4” drill depth, the setting bit can be used in drill mode without damaging the anchor threads.
We learned of this anchoring system while attending the #toughinthesouth new tool event in Nashville, TN.
https://www.youtube.com/watch?v=YGH8T6acmSs
Video footage credit: Heather Aune, mechanical-hub.com
It’s been two months since I took delivery of the Dewalt DCE200 press tool and I’ve had the opportunity to put it to work on a handful of jobs now. This is a feature-packed tool unlike many on the market today. With capabilities of handling any and all press systems common in North America and Read more
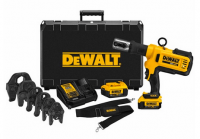
 It’s been two months since I took delivery of the Dewalt DCE200 press tool and I’ve had the opportunity to put it to work on a handful of jobs now. This is a feature-packed tool unlike many on the market today. With capabilities of handling any and all press systems common in North America and Europe team Black & Yellow pulled out all the stops in engineering their first at what I’m guessing will be a team of press tools to come.
First off I’d like to cover the important specs.
- Capable of pressing ½”-2” copper & stainless steel V-groove fittings
- Compatible with competitor jaw sets for Iron Pipe [Mega-Press]
- Compatible with competitor jaw sets for PEX press [Viega/Nibco]
- 4-ton pressing force
- Current online pricing searches average $1999.00
I first learned of this tool back in July/August of 2016 at the annual new tool event hosted by Dewalt. When I first put my hands on it I admit I was a little surprised of the physical size overall but after using it for both boiler and tankless water heater installations now I can honestly say the size of the tool has not proved to be an issue at all. Weighing in at 7.16lbs without a jaw it is lighter than other comparable tools common on the job today. Ergonomics may be a slightly different story and I do carry a bias toward in-line design press tools. This tool is front-end heavy, loaded with anything over 1″ jaws and it will not stand on it’s own. That may be partially due to the small footprint of the 20V battery or the handle angle and placement. Either way its a strain on the wrist and requires two hands to steady the tool most of the time.
Features
This pistol-grip press tool is packed with some new innovation to the market that should prove useful to many contractors working on commercial & residential projects alike. Notably, Dewalt’s proprietary software system Crimp Connect. This free software download allows the owner/user to connect the press tool via the onboard mini USB port providing ability to print detailed reports of the date, time, force, and successfully completed cycles of the presses completed by the tool as well as the tools calibration and service history.
 Located on the top rear of the tool you’ll find a somewhat familiar interactive panel where the tool’s power is controlled along with LED light indicators showing the successful completion of a single press, battery indicator, low & high temperature warnings. There’s even a “service required” indicator light telling the user that the tool has reached the cycle limitations.
While the power panel is not unique to press tools of this caliber, the Crimp connect feature is. An added feature I found interesting is the double trigger.
 The bottom trigger controls the start and completion of the press cycle. Dewalt went with a “manual” cycle operation here. You’ll need to depress the trigger completely for the duration to complete the press cycle. Cycle time is anywhere between 4-6 seconds depending on the diameter and type of material being pressed. The unique second trigger, the top trigger can be used to release the press cycle at any point. This is useful when a cycle has started but the operator decides [far various reasons] to stop the press. When pressed fully, the top trigger will release the pressure in the hydraulic cylinder and allow the ram to retract quickly. This would allow for repositioning of the tool or fitting when needed, potentially saving a fitting from incorrect attachment to the piping.
A shoulder strap and ring attachment point are included with the tool. Dewalt states in the manual that it should be used for transporting the tool on the jobsite. Some feedback I have received from other plumbers is the strap may be useful when working on a ladder, a situation that often lends to the possibility of dropping a tool like this….I’ve done that and it wasn’t pretty.
The tool is made in France but the jaw set is delivered to Dewalt from Germany. Dewalt is offering a 3 year limited warranty, 1 year service and 90 day money back guarantee. You’ll most likely have to order this tool from specialty tool suppliers offering the whole Dewalt lineup. You can also look to plumbing and mechanical supply houses for stock as well.
https://www.youtube.com/watch?v=WVIlalA-Abs
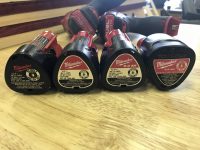
Cordless tools have nearly taken over the new construction and remodel jobsite entirely. With advancements like battery capacity, runtime and motor efficiency with onboard discharge monitoring today’s cordless tools are routinely performing at or above the level of production and power than their corded predecessors. Sure, everyone has said it myself included; there’s really no Read more
 Cordless tools have nearly taken over the new construction and remodel jobsite entirely. With advancements like battery capacity, runtime and motor efficiency with onboard discharge monitoring today’s cordless tools are routinely performing at or above the level of production and power than their corded predecessors.
Sure, everyone has said it myself included; there’s really no need to lug an extension cord onto the job today. As old tools have reached the end of their useful and productive lifespan most are definitely being replaced with battery powered “upgrades”. As we all know not all tools are created equal the same should be said, and more often, about their power source; the battery.
With the multitude of choices in the cordless tool market I’m going to focus on one single platform to keep the message clear. I’m not choosing one brand over another out of preference or performance; my focus here is battery identification and what exactly we should be looking at to make the best purchasing choices with our hard-earned money.
Today’s manufacturers have invested entirely in lithium ion battery cell technology, long gone are the NiCad batteries of yesterday and to that I say good riddance. For the purpose of this article I’ll be using Milwaukee Tool’s M12 batteries in attempt to explain the differences in capacity and how to identify the right battery for your tool.
First, let’s get this out of the way, tool manufacturers in North America have long dropped the facts for the sake of marketing in labeling their tools lines. The 12V, 18V, 20V and 60V batteries produced by the major tool companies are all overrated in name and labeling. I’m not exactly sure why a 10.8V battery is labeled as a 12V but I’d guess it has more to do with the expected performance than graphics on packaging and more to do with 12 simply being the bigger number. Regardless, 60V [actually 54V] is the current king because it’s the biggest, right? We’re trained to think “bigger is better” and they’ve played into that 100%.
While it should go without saying that a typical 12V battery tool has less potential than its 18V bigger brother that’s not always the case for multiple reasons, one of them being the Ah [Amp Hour] ratings of the battery packs.
Runtime, potential power, voltage delivery etc are all tied back to or are related to this significant and often overlooked rating. The science behind the Ah is simple; a battery rated at 1Ah should be able to continuously supply a current of 1 amp to a load for exactly 1 hour, or 2 amps for 1/2 hour, or 1/3 amp for 3 hours, etc., before becoming completely discharged.
In an ideal battery, this relationship between continuous current and discharge time is stable and absolute, but real batteries don’t behave exactly as this simple linear formula would indicate. Therefore, when amp-hour capacity is given for a battery, it is specified at either a given current, given time, or assumed to be rated for a time period of 8 hours (if no limiting factor is given). Sometimes to understand the Amo Hour we need to also work with the Watt Hour [Wh]…just to further complicate things a little.
Let’s take for example the standard, lowest capacity M12 battery from Milwaukee. This battery is rated as 14 Wh [Watt Hours). Some simple math can convert Wh to Ah with this formula: (Wh)/(V) =(Ah). And you thought you left that back in 8th grade… When calculated out the Ah rating for this example is 1.1666 Ah. Meaning this pack should delivery 12V at 1A for slightly more than an hour. Of course when placed under higher or lower load conditions performance will change.
Milwaukee offers M12 batteries of multiple Ah ratings of course, as do other manufacturers but there seems to be different ideas on how to label these batteries so knowing how to identify the capacity will help you make an informed decision.
Moving up the M12 battery line the next offering is rated 16Wh and when plugged in to the formula we find out it’s a 1.333 Ah pack. That’s not a significant jump in power potential, a few minutes really but it comes at a price at the register. Moving even further up the M12 line takes us to a more recent product in the 2.0Ah labeled pack. It’s a 22Wh pack and has theoretically twice the capacity of the first two discussed so far.
Recent advancements in lithium cell technology, along with manufacturing processes have brought along even larger Ah capacity batteries of all voltages, not just the 12V batteries used for example here. As capacity increases so does the physical size to a point, further advancement of heat dissipation and cell quality is underway making it possible to assemble battery packs that are actually more powerful and physically smaller or the same size as lower rated packs.
 A perfect example is the M12 XC 4.0Ah and M12 XC 6.0Ah battery packs. Both are the largest in physical size of all the Milwaukee 12V batteries but identical in size to each other. This is due to the type of lithium cells used in manufacturing and how those individual cells are assembled inside the rugged exterior shell. Quick math would show that the 6.0Ah pack has the potential runtime of almost 600% more than the 14Wh M12 pack. That capacity rating comes at a cost of course but in staying with the “bigger is better” philosophy you will definitely be getting longer runtime and possibly more bang for your buck.
Knowing what Wh and Ah really means and using that to compare one battery to another will hopefully help you select the best value for your cash and at the end of the day we all share the common goal of getting the most out of our time and money. Hope this helps.
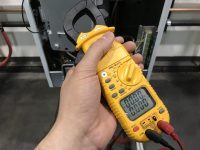
One of the worst feelings in the world for a certified heating professional is to be on a jobsite and to realize he/she doesn’t have the tools necessary to complete the task. While experience in the field is the best education when it comes to identifying the essentials, a little guidance is always helpful. Here Read more
One of the worst feelings in the world for a certified heating professional is to be on a jobsite and to realize he/she doesn’t have the tools necessary to complete the task. While experience in the field is the best education when it comes to identifying the essentials, a little guidance is always helpful. Here are our picks for the top 3 tools every Hydronic heating professional should have.
 Combustion Analyzer: The primary purpose behind a Combustion analyzer is to verify whether or not the boiler is performing at peak efficiency. By measuring the products of combustion through this preventive maintenance measure, a service professional is able to quickly identify appliance issues that could hinder product performance. Such problems include, but are not limited to, low fuel pressure, backdrafting, lack of make-up air, obstructed flue or a cracked heat exchanger.
 Manometer: A device used to test incoming gas pressure and how much the pressure drops on start up. If your incoming gas pressure is too low, the unit could experience delayed ignition, failure to ignite, and reduced operating efficiency. These are all factors which contribute to increased callbacks and a decrease in customer satisfaction.
 Multimeter: Essentially this tool helps contractors to identify whether power is going to the boiler or not. Typically, it has 3 units of measurement: Volts, Ohms, and/or Amps, which are used to verify that an electrical current is reaching all the intended components. The volts option is used to test voltage to the blower, gas valve, and pumps, while the Ohms setting checks fuses, sensors, and continuity. Something else worth considering is that most multimeters in the mid-range price point have numerous accessories built-in, allowing one tool to satisfy multiple demands. In many cases, your meter can also be a very accurate temperature tester, which is ideal in cases when the boiler display doesn’t read the sensors value individually, when your water heater isn’t working with your mixing valve or if you need to determine the rate of flow in an emitter loop.
What are your top “must have” tools for performing work on hydronic heating equipment? Is there an apparatus that you find yourself utilizing regularly for service calls or installations?
 Jaime Jimenez is the marketing coordinator for ACV Triangle Tube. Headquartered in Blackwood, New Jersey, ACV Triangle Tube engineers and manufactures a wide range of space heating, water heating, and other HVAC related products for residential, commercial and industrial markets. Visit www.triangletube.com.
