EPISODE 1: The Color of Heat Monday, Jan. 25 6:30-7:30 pm CST There is a new sheriff in town! Bob “Hot Rod” Rohr is back in the saddle for this 2021 edition of Shop Talk. We’ve partnered up with Mechanical Hub to offer you a real good time. In Episode 1 Hot Rod will yarn Read more
thermal imaging

Monday, Jan. 25
6:30-7:30 pm CST
There is a new sheriff in town! Bob “Hot Rod” Rohr is back in the saddle for this 2021 edition of Shop Talk. We’ve partnered up with Mechanical Hub to offer you a real good time.
In Episode 1 Hot Rod will yarn the hour away talking shop about thermal imaging and how it can help buckaroos young and old alike in the field. He will share tips from the shop with a few infrared photos to boot. Watch for a giveaway. One ace-high member of our audience will take home a FLIR C3-X thermal camera. Yee-haw!

It wouldn’t be a Showdown without a duel. Sheriff Hot Rod will moderate a spirited debate between guest speaker Eric Aune of The Hub and Max Rohr of Caleffi.
You’ll learn:
→ What role does a thermal imaging camera play in modern mechanical systems?
→ If you find yourself in a hole, the first thing to do is stop digging; a.k.a. troubleshooting
→ How important is insulation on the side of a radiant slab?
→ How can you get the most accurate readings from a thermal camera?
→ Could you even use it to decide between zone pumps and zone valves for your next project?
Don’t know “Hot Rod“? Recently recognized with the 2020-2022 Carlson-Holohan Industry Award of Excellence, he effortlessly shares his 35+ years’ of experience as a contractor and currently serves as a training and education manager at Caleffi.
Eric, owner of Aune Plumbing and Heating and operating partner of the popular Mechanical Hub website, is driven to learn and motivated to teach. Aune specializes in radiant heating, high efficiency hydronic systems and – in his own words – is a “tool nut”.
Max is a self-described hydronics and thermostat nerd. He has worked in the hydronics and solar industries for 20 years in the installation, sales and manufacturing sectors. Like father, like son Max, currently serves as a training and education manager at Caleffi.

Identifies hard to see problems and saves homeowners money For many years, utilities and large companies used thermal imaging to uncover potential heat problems across large areas and to keep track of heavy machinery. But more recently, thermal imaging has truly become a game changer for most contractors and others in the building trades. Thermal Read more
Identifies hard to see problems and saves homeowners money
For many years, utilities and large companies used thermal imaging to uncover potential heat problems across large areas and to keep track of heavy machinery. But more recently, thermal imaging has truly become a game changer for most contractors and others in the building trades. Thermal cameras help contractors find and document energy loss and other problems they could not otherwise easily find. This saves them time and money – which ultimately results in homeowners saving money. Most recently, contractors have begun to combine portable thermal imaging cameras with moisture meters. Using thermal imaging to find the issue and the moisture meter to verify it saves time and helps avoid surprises that will ultimately cost homeowners more.
Thermal imaging benefits contractors and homeowners
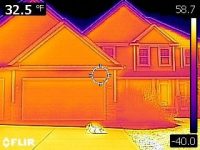
Thermal imaging detects heat given off by an object or person. It takes the energy and translates it into light that can be seen. Using the typical “Ironbow” color palette, the viewer sees the light in a range of colors: red, orange, and yellow indicates heat, while dark blue, black, or purple signifies colder temperature. Cold can represent air leaks through door and window frames, missing insulation, and water – especially evaporating water. No other technology can provide this information. Using radiation energy, contractors can now actually “see” energy loss. It is like giving contractors a super power! Thermal imaging is extremely sensitive; potential problems stand out and can be found and documented in real time.
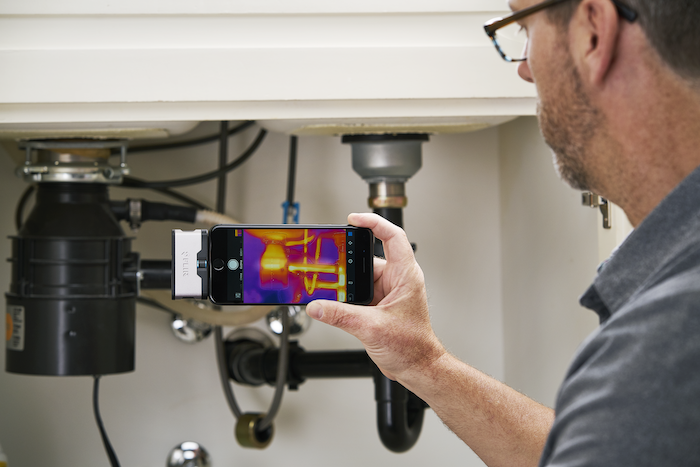
Thermal imaging camera in action.
Home inspectors were the first to adopt the use of thermal imaging, but all the building trades are now jumping on board. Most recently electricians, HVAC technicians, and plumbers have started to use thermal imaging to find problem areas quicker—and from a safer distance. In essence, thermal imaging can be used by all trades – if they are not using it now they should start using it.
The number one application contractors use thermal imaging for is to locate energy loss in hotter and colder months caused by missing insulation and poor sealing around doors and windows. Interestingly, the number two use is to locate pest infestations, including termites and rodents. While thermal imaging cannot “see” a single termite, it is excellent for locating termite nests, because of the massive amount of heat generated by huge numbers of termites living together. The third most common application is for detecting water intrusion in houses and business. Thermal imaging points contractors in the right direction, and moisture meters are then used to isolate the problem.
One other essential feature of thermal imaging is that it can be used to document issues to show customers. As a contractor who works closely with clients, I believe it is absolutely crucial that customers have a clear and in-depth understanding of what is going on with their project. Thermal imaging gives contractors the ability to proactively bring up and demonstrate issues. If the issue is something they should be concerned with, it is important to be able to document that issue with a picture or video. The more information homeowners have, the better off they will be.
Pairing thermal imaging with moisture meters offers a one-two punch
Recently, many in the building trades have begun to realize the benefits of pairing thermal imaging with moisture meters. This combination is especially effective because thermal imaging by itself does not distinguish between cold temperatures and moisture. Both show up as a dark blue image, so contractors cannot tell if the image indicates moisture or cold air. Using the two technologies together, they can simultaneously find energy loss and moisture intrusion – giving contractors a real one-two punch.
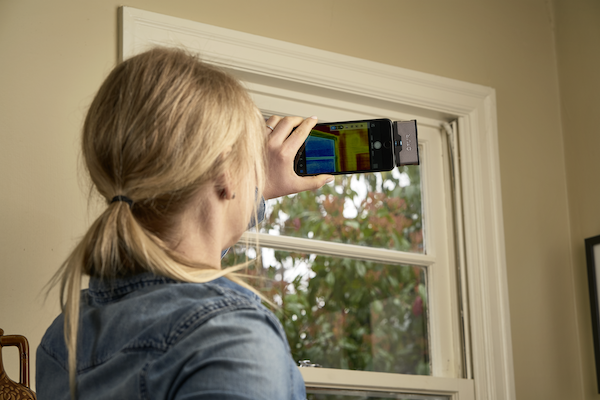
Thermal imaging can reveal issue regarding missing insulation or poor sealing around window or door.
Using thermal imaging to find the issue and the moisture meter to verify it saves time – by taking the moisture meter to the area of concern a contractor can isolate the problem and quickly determine its seriousness and extent. Before the ability to pair the two technologies, contractors had moisture meters, but they had to tear the entire wall down to address a suspected problem. Using the non-contact or non-invasive/non-destructive detection methods together helps contractors confine the problem to a smaller area so they can avoid taking that wall down. The moisture meter will indicate if the spot is a matter for concern.
New affordable technology makes combining thermal imaging and moisture reading a snap
In the past few years I have been bringing thermal imaging and moisture reading equipment to every job site I visit. I use the FLIR ONE® PRO thermal imaging camera attachment in combination with the FLIR MR40 moisture meter. Both are extremely easy to use, which is especially helpful for those contractors who are not particularly tech savvy. You can attach the thermal camera to your smart phone, and the phone becomes the viewer.
I started using FLIR thermal imaging technology some years ago and this latest third generation technology has significantly improved, with even better image quality. At a cost of only $399, the FLIR ONE Pro is much more affordable for contractors than in the past. It also pays off quickly because of the money saved by finding problems more quickly.
Especially useful is the multi spectral dynamic imaging (MSX) technology, which enables users to overlay the visual with the thermal to get a clear image that the contractor can then decipher. This means users are not just seeing a screen of colors, they are seeing the definition of what they are looking at.
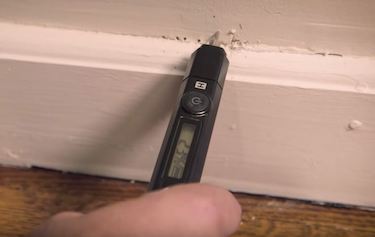
FLIR MR40 moisture meter in use.
MSX incorporates real-time thermal video enhanced with visible spectrum definition. It produces exceptional thermal clarity to highlight exactly where the problem is. MSX ensures easier target identification without compromising radiometric data. The quality of the thermal images is excellent, with almost no need for a separate digital image. With MSX, thermal images look sharper, the orientation of the target is done more quickly and the reports are clutter-free. Users can see the results of MSX technology directly on the touchscreen of the camera, in real time.
Another practical feature of the FLIR ONE Pro is the 1-fit connector. This allows users to adjust the camera’s fit, so they can use the attachment with thicker cell phone cases.
The FLIR MR40 moisture meter is my go-to option, primarily because it is so easy to use. Anyone can operate it easily, even if they have never used a moisture meter before. The portable, rugged moisture meter comes with an integrated flashlight. It is also small and tough, fitting easily in a pocket. I have used it in tight spaces and I have dropped it, and the meter remains accurate and incredibly reliable. It is affordable and a quick tool to find and quantify moisture content. When used in combination with a thermal camera, MR40 can help confirm whether a cold spot in a thermal image is moisture, and measure the severity of the problem. If it measures in the 20 percent range or above, it would be considered a problem. Below 10 percent it would not be considered a problem.
Other all in one imagers plus moisture meter options include the FLIR MR160 and the MR176. With these options there is no need to carry two separate pieces of equipment.
New technology provides contractors with peace of mind
Using the FLIR ONE Pro in combination with the FLIR MR40 moisture meter has made a big difference in my business. I look on them as tools like all the others that would be used on a job, but they are especially important in the initial phase of dealing with customers and quoting jobs. In the past unforeseen issues would arise that would bring higher costs. Now, contractors can virtually see the invisible, reducing unforeseen and unwelcome surprises often costing more money to repair.
As a contractor, the tools provide peace of mind, and also ensure the situation has been thoroughly examined. I never leave home without them.
By Jason Cameron, licensed contractor and host of DIY Network’s Desperate Landscape, Man Caves and Sledgehammer.
Affordable Digital Device Combines Thermal Imaging with Precision Electrical Measurement FLIR announces the FLIR DM166 thermal imaging multimeter with Infrared Guided Measurement (IGM™), the industry’s most affordable digital multimeter/thermal imager combination. The FLIR DM166 features 80×60 thermal resolution, broad multimeter test functions, and the flexibility for use in both high and low voltage applications. Designed Read more
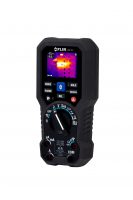
Affordable Digital Device Combines Thermal Imaging with Precision Electrical Measurement
 FLIR announces the FLIR DM166 thermal imaging multimeter with Infrared Guided Measurement (IGM™), the industry’s most affordable digital multimeter/thermal imager combination. The FLIR DM166 features 80×60 thermal resolution, broad multimeter test functions, and the flexibility for use in both high and low voltage applications.
Designed to provide faster troubleshooting in applications such as electrical distribution, electro-mechanical systems, HVAC/R, and electronics, the FLIR DM166 features a FLIR Lepton® thermal microcamera core that visually guides users to the precise location of a problem. The feature-packed multimeter helps users pinpoint issues faster, and then troubleshoot complex electrical distribution and electro-mechanical systems more effectively and efficiently.
Thermal imaging is a non-contact temperature measurement method, allowing the user to more safely scan for overheating system components. Additionally, with a rugged, drop-tested design and the safety rating electrical and HVAC professionals’ need, the FLIR DM166 is field-ready for even the most demanding applications.
The FLIR DM166 carries a 10-year warranty on both the product and the thermal detector. It will be available in fourth quarter 2017 for $499.99. For more information visit www.flir.com/professionalDMMs.
As with all the tools we test here at The Hub we like to get a few weeks of actual jobsite use under our belt before reporting back to you. About a month ago I started using the FLIR C2 Compact Thermal Imager with MSX patented multi-spectral technology. Here are the facts and my findings Read more
 As with all the tools we test here at The Hub we like to get a few weeks of actual jobsite use under our belt before reporting back to you. About a month ago I started using the FLIR C2 Compact Thermal Imager with MSX patented multi-spectral technology. Here are the facts and my findings.
It hasn’t been that long since I used to hire local inspection agency to come out to my jobs to do thermal imaging. At the time I would pay few hundred dollars for a couple hours of work which roughly equates to about half of what it costs to own a thermal imaging device today. The technology has advanced to a point where productions of more compact, very capable hard and software has brought these devices/cameras well below $1K. Wait, what?! Yeah, my first camera was a little over two thousand dollars and I went half in with a contractor friend to share the costs; not really knowing if the investment would ever pay off.
The FLIR C2 retails for $699 making it an excellent buy for any contractor looking to add the benefits a thermal imaging device brings to the ever-growing tool bag. After having owned a couple thermal imagers now I cannot imagine not having one available. Challenges such as locating radiant tubing embedded in a slab or below a floor and hot spots on heat exchangers are often effortless tasks when you’re armed with these devices.
Using the FLIR C2 Thermal Imaging Camera
Right out of the box the FLIR C2 is intuitive and extremely easy to use; producing excellent images straight away. Similar to any compact automatic camera the C2 captures digital image of a scene but simultaneously captures a thermal image with a simple push of one button. The C2 is auto-focusing.


Above are both the digital photo and the thermal image I captured of a radiant manifold in a client’s garage. Both images are captured simultaneously and can be compiled side by side with the free FLIR Tools software.
Hardware
The rugged rubber like body cover of the C2 not only provides some level of protection but also makes holding on to the camera a little easier. The backbone of the C2 is the FLIR Lepton thermal core, which it shares with other recent products including the FLIR ONE for smart phones, and the FLIR TG165 Imaging Thermometer.
The resolution of the Lepton in the C2 is 80 x 60, for a total of 4800 pixels. Each pixel is sensitive to 0.10 °C temperature variations–that’s excellent thermal sensitivity for a camera that fits in your pocket. The overall imaging and measurement range for the FLIR C2 is from 14 to 302 °F (–10 to 150 °C). Most users will find this fits well within the needs encountered on the jobsite, whether diagnosing electrical or mechanical equipment.
The wide-angle lens on the C2 allows larger imaging of a scene at in one shot; most users will find this an asset because of the fixed lens [think smart phone camera] on the C2. The wide, fixed lens will produce a clear image of any object over 6” away. The C2 features a 3” capacitive touchscreen.
MSX
The C2 uses the visible light camera to create FLIR’s excellent MSX blending technology. MSX mines a visible image for edges, writing, and patterns, then etches these details onto the thermal image. The thermal image retains all of its coloration and information, while the subtle grayscale of the MSX details aid significantly in object identification. To ensure that MSX works even in dark conditions, the C2 includes a bright LED flash which doubles as a spotlight.
Software
All thermal images on the C2 contain full radiometric data holding a ton of potential information. When downloaded to the FLIR Tools software [included free for both PC & MAC], each pixel in an image can deliver temperature data using multiple measurement options. You can add multiple spot meters, area boxes with min/max/avg and more. I’d be wrong not to emphasize how impressive it is for a thermal imager at this price point to offer radiometric data and full software support. Creating professional reports and organizing images is easily accomplished with FLIR Tools. Although I have yet to try it a surprising feature of the FLIR C2 is its ability to stream live video to a computer running FLIR Tools. This may be helpful when analyzing a problem across multiple load conditions. Video streaming from the C2 is not radiometric.

Image Storage
The FLIR C2 thermal camera can store 500 full sets of images (thermal, visible, MSX) to internal flash memory. A conveniently large button on the top of the camera, making one-handed use of the C2 quite simple, captures images. Images can be reviewed directly on the camera, easily toggling between the various versions of any image. All images are stored as JPEG files, giving users great flexibility in how and where to use the pictures. Download of the stored files is accomplished through a micro USB cable connected to any MAC or PC.
Wrap up
Overall the C2 is more than just a novelty and a huge step forward for thermal imaging devices priced below $1K. If you have been shopping for a portable, versatile camera and want it loaded with features offered by much higher cost models then take the time to check the C2 out. If you have anything to add to this review please do not hesitate to leave a comment below or email us at info@mechanical-hub.com.


The next generation of thermal imaging devices are here. Last month at AHR 2016 in Orlando I put my hands on two of the latest thermal imaging devices designed for the trades; both had great feature sets for devices which have been drastically reduced in physical size and cost. Four years ago I bought a Read more
The next generation of thermal imaging devices are here.
Last month at AHR 2016 in Orlando I put my hands on two of the latest thermal imaging devices designed for the trades; both had great feature sets for devices which have been drastically reduced in physical size and cost.
Four years ago I bought a Milwaukee Thermal Imaging camera. This purchase came with great consideration; the $2500 price tag was a big pill to swallow for me at the time. In hindsight, it may have been one of the single most valuable purchases I have made.
Initially I was very concerned about how frequently I would use the camera. A common misconception with these devices is that they’re really just a cool toy. I am here to tell you that is not the case they are very cool toys! In the last four years I have had the opportunity to use the camera to not only save myself countless hours diagnosing the source of all sorts of problems but also to save my customers thousands if not tens of thousands of dollars.
In one particular case a while back I had a new customer call with wet carpet in the basement. After hours of searching for a leak, they had exhausted all of their options. They called me in to help. During the initial phone conversation the camera was not even brought up. After I had made an initial site visit, it was apparent that this was not your common leak. As we looked through many possible scenarios in the area of the leak none of those were getting us any closer to fixing the problem. I should say at the time the newness of the camera had worn off; it had been stowed in the back seat of my service truck so naturally it wasn’t at the top of my mind but, with one quick trip out to the truck I was on the fast track to finding the source of the problem.
The water line leading to the icemaker on the refrigerator had sprung a leak, dripping through the wall and landing on the waste pipe for the kitchen sink. Once on the PVC, the water proceeded to traveling the entire width of the basement, nearly 15 feet before it finally dripped onto the sheetrock and ran down the backside of an interior wall. Without the camera my only course of action would be to start removing sheet rock until the source was identified. The initial dripping from subfloor to PVC, caused a small splatter, leading to a pancake size damp spot on the backside of the sheetrock. This small spot immediately showed up through the lens of the camera on a quick scan of the ceiling. The splatter measured only a few tenths of a degree difference and would be nearly impossible to detect with any other tools. We made a small opening in the ceiling at the location and found the drip, which then led to the ice supply line. In this particular case, what may have taken a stroke of luck to find without the IR camera, I was able to identify the source of the leak in a matter of a few minutes. Pinpointing the source saved hundreds if not thousands of dollars in sheet rock repairs. This is just one example of the many uses for IR technology on the jobsite.
Back to AHR
 While at the Milwaukee Tool booth I tested out the latest M12 thermal imager on display. The Milwaukee M12 7.8Kp Thermal Imager delivers 7,800+ pixel image detail. Team Red’s DUAL SENSE™ pixel technology produces crisp images of heat loss, electrical resistance, water damage and mechanical issues. On-screen temperature readout and 83:1 distance-to-spot ratio gives users precise, real-time measurements from a distance. The M12 7.8KP captures, stores and shares images using the included SD card and USB cable. It’s fully compatible with Milwaukee Thermal Imager Reporting Software for archiving, analyzing and reporting. This camera is priced at $499 retail. It’s rugged and comes with a battery, charger and soft case.

 Flir’s C2 had a similar feature set to my 4 year old camera, with the addition of improved resolution, built-in image overlay software and auto focus for starters. The physical size of the C2 is roughly that of an iPhone and included a rugged protective outer shell. A product rep at the booth, noted that the internal memory could store nearly 500 Thermal and Visual images. The C2 features FLIR’s unique MSX® that adds key details from the onboard visible light camera to the entire infrared image in real time. The result is an all-in-one, undiluted thermal picture with visible light features that lets you instantly recognize where the problematic heat pattern is. The compact device does not record video, but displays the hybrid thermal image in real time. With a $699 MSRP, this device brings high-end thermal imaging to the masses.
